In this article, you’ll discover 5 simple fixes that can save you time and money when it comes to repairing your scooter. Whether you’re a DIY enthusiast or a scooter owner looking to troubleshoot some common issues, these steps will guide you through the process with ease. From addressing flat tires to fixing faulty brakes, these quick and easy solutions will have your scooter up and running smoothly in no time. So grab your tools and get ready to become a pro at DIY scooter repairs!
Clean and Lubricate the Bearings

This image is property of pixabay.com.
Check out our product reviews!
Types of bearings in a scooter
In a scooter, there are two main types of bearings that play a crucial role in its smooth operation: wheel bearings and headset bearings. Wheel bearings are located in the wheels and allow them to rotate freely. On the other hand, headset bearings are found in the steering mechanism of the scooter, enabling smooth and easy turning.
Signs of worn-out or dirty bearings
It is essential to stay vigilant and be aware of the signs that indicate your scooter bearings are worn-out or dirty. Some common indicators include a grinding or clicking noise coming from the wheels or headset, excessive play or looseness in the steering, and difficulty in turning smoothly. Additionally, if you notice any rust, dirt, or debris on the bearings, it’s a clear sign that they need attention.
Steps to clean and lubricate the bearings
Regular maintenance and cleaning of scooter bearings will help prolong their lifespan and ensure optimal performance. To clean the bearings, start by removing them from the wheels or headset. Use a solvent or a specialized bearing cleaner to soak the bearings and remove any dirt or grime. Once clean, dry them thoroughly and inspect for any damage. Next, apply a suitable bearing lubricant and ensure all parts are well-coated. Finally, reassemble the bearings and ensure they are properly seated before using the scooter again.
Importance of regular bearing maintenance
Regular maintenance of scooter bearings is paramount for a smooth and safe ride. By keeping the bearings clean and lubricated, you reduce friction and wear, preventing premature damage or failure. Neglecting bearing maintenance can result in an uncomfortable ride, decreased maneuverability, and even potential accidents. By taking the time to regularly maintain your scooter’s bearings, you can ensure the longevity and optimal performance of your favorite mode of transportation.
Inspect and Adjust the Brake System
Common brake issues in scooters
Brake issues are common in scooters and can significantly affect your safety while riding. Some common brake problems include squeaking or grinding noises when applying the brakes, a soft or spongy brake lever, reduced braking power, or brakes that fail to engage altogether. Identifying these issues early on is crucial for ensuring your scooter’s brakes are in good working order.

This image is property of pixabay.com.
Check out our product reviews!
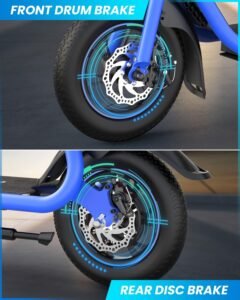
Checking brake pads and discs
Start by visually inspecting the brake pads and discs for signs of wear or damage. Brake pads should have an adequate thickness, and the surface should be smooth and flat. If you notice any uneven wear, deep grooves, or damaged brake pads, it is time for a replacement. Similarly, inspect the brake discs for any signs of warping or excessive wear, as these can lead to poor braking performance.
Adjusting brake cable tension
In some cases, the brake cable tension in scooters may require adjustment to ensure optimal braking performance. Begin by locating the brake cable adjuster, usually found near the brake lever or caliper. Loosen the locking nut and adjust the tension by turning the adjuster clockwise to tighten or counterclockwise to loosen. Make small adjustments at a time and test the brakes after each adjustment to ensure they engage properly without excessive play.
Replacing brake components
If brake issues persist despite proper inspection and adjustment, it may be necessary to replace certain brake components. Worn-out brake pads or discs should be replaced promptly to ensure safe and effective braking. Similarly, if there is any damage or corrosion on the brake calipers or brake lines, they should be replaced to maintain proper functionality. Always consult the manufacturer’s guidelines or seek professional assistance when replacing brake components to ensure the correct parts are used and installed properly.
Check and Replace the Scooter Belt
Symptoms of a worn-out belt
The scooter belt plays a crucial role in transferring power from the engine to the wheels. Over time, it can become worn-out or stretched, affecting the scooter’s performance. Some common symptoms of a worn-out belt include a decrease in acceleration, a noticeable decrease in top speed, a burning smell coming from the belt area, or visible damage such as cracks or fraying.
Steps to check the condition of the belt
To check the condition of the scooter belt, start by visually inspecting it for any signs of wear, damage, or stretching. Look for cracks, fraying, or missing pieces, as these indicate that the belt needs replacement. Next, check the belt tension by applying pressure in the center with your finger. It should have a slight give but not be excessively loose. If you notice any signs of wear or the belt feels loose, it’s time to replace it.

This image is property of pixabay.com.
Replacing the scooter belt
Replacing a worn-out scooter belt is relatively straightforward and can be done with the right tools and a little patience. Start by loosening the tension on the belt by adjusting the variator or clutch. Once the tension is relieved, remove the old belt from the scooter. Take note of the belt’s routing, as it will help when installing the new belt. Install the new belt, following the correct routing, and return the tension to the appropriate level. Finally, ensure the belt is securely seated on all pulleys.
Tips for maintaining belt longevity
To extend the lifespan of your scooter belt, there are a few maintenance tips to keep in mind. Avoid excessive high-speed acceleration, as it puts unnecessary strain on the belt. Additionally, regularly inspect the belt for signs of wear or damage, and replace it promptly when needed. Keep the belt area clean and free of debris to prevent any contaminants from affecting its performance. By following these simple tips, you can ensure your scooter belt lasts as long as possible and maintains optimal performance.
Tighten Loose Bolts and Screws
Importance of regular bolt and screw checks
Loose bolts and screws can not only affect the overall stability and safety of your scooter, but they can also lead to potential damage or accidents. Regularly checking and tightening loose bolts and screws is a simple yet vital maintenance task that ensures all components of your scooter stay securely in place.
Identifying loose bolts and screws
To identify loose bolts and screws on your scooter, thoroughly inspect all visible components such as the handlebars, brake levers, headset, and wheels. Look for any obvious signs of movement or rattling. Additionally, pay attention to any unusual noises while riding, as they can indicate loose components. Taking the time to perform a visual and auditory inspection will help detect loose bolts and screws before they become a safety hazard.
Using the correct tools for tightening
When tightening loose bolts and screws on your scooter, it is essential to use the correct tools to prevent damage or stripping. A set of Allen wrenches or a socket set with various sizes will be necessary to tighten different bolts and screws. Ensure you select the appropriate size for each component and apply steady, even pressure while tightening. Avoid over-tightening, as it can lead to thread damage or component failure.
Applying thread-locking compounds
To further secure important bolts and screws, such as those on the handlebars or wheels, consider using thread-locking compounds. These compounds help prevent loosening due to vibrations and ensure a strong, reliable connection. Follow the manufacturer’s instructions for applying the thread-locking compound, and allow ample time for it to dry before using the scooter. With the addition of thread-locking compounds, you can have peace of mind knowing that critical bolts and screws will stay securely in place.
Troubleshoot Electrical Issues
Common electrical problems in scooters
Electrical issues can be frustrating, but they are a common occurrence in scooters. Some common electrical problems include a dead or weak battery, malfunctioning headlights or taillights, faulty ignition switches, or issues with the scooter’s wiring. Identifying and troubleshooting these problems is crucial to ensure your scooter’s electrical system works flawlessly.
Checking the battery and connections
Start by checking the battery’s voltage using a multimeter. A healthy battery should read around 12.6 volts or above. If the voltage is significantly lower, it may be time to replace the battery. Next, inspect the battery connections for any corrosion or loose connections. Clean the terminals and connectors, ensuring they are securely attached. Loose or corroded connections can impede the battery’s ability to provide power to the electrical system.
Testing the fuse and wiring
Electrical issues can sometimes be attributed to blown fuses or faulty wiring. Locate the fuse box and visually inspect all fuses for signs of damage. Replace any blown fuses with new ones of the appropriate rating. If the fuses appear to be intact, the next step is to test the scooter’s wiring. Use a multimeter to check for continuity in the wiring harness, ensuring there are no breaks or shorts. If faulty wiring is identified, it may require professional assistance to repair or replace the affected wiring.
Repairing or replacing faulty components
If troubleshooting the electrical system doesn’t resolve the issue, it may be necessary to repair or replace specific electrical components. Malfunctioning headlights, taillights, or turn signals should be inspected for faulty bulbs or wiring connections. Ignition switches or starter solenoids that fail to function correctly may require replacement. In cases where the electrical problem is beyond your expertise, it is advisable to seek professional help to diagnose and repair the issue accurately.
Remember, maintaining a well-functioning electrical system is essential for a safe and enjoyable riding experience. Regular inspection, troubleshooting, and timely repairs will ensure your scooter’s electrical components remain reliable and in good working order.
By following these simple fixes, you can ensure your scooter remains in excellent condition and provides years of reliable service. Regular maintenance, inspection, and repair not only enhance your riding experience but also contribute to your safety on the road. Always consult the manufacturer’s guidelines and seek professional assistance when needed. With a little TLC and proper care, your scooter will continue to be your trusty companion on all your adventures.