Maintaining the perfect ride on your beloved scooter doesn’t have to feel like an overwhelming task anymore. In this article, you will discover the secrets to mastering the art of scooter upkeep, focusing on the essential aspects of cleaning and maintaining your scooter. With simple yet effective tips and tricks, you will soon be able to keep your scooter in top-notch condition, ensuring a smoother and more enjoyable ride every time. Say goodbye to the hassle of frequent repairs and hello to a well-maintained scooter that will be the envy of all your friends.

This image is property of images.pexels.com.
Check out our product reviews!
Regular Cleaning
Importance of regular cleaning
Regular cleaning of your scooter is essential to maintain its appearance, performance, and longevity. By keeping your scooter clean, you not only improve its overall aesthetics but also prevent the buildup of dirt, debris, and grime that can cause damage over time. Regular cleaning also allows you to identify any signs of wear or potential issues early on, enabling you to address them promptly before they become major problems. Moreover, a clean scooter is a reflection of your pride of ownership and adds to your personal enjoyment of riding.
Materials needed for cleaning
To effectively clean your scooter, you will need a few basic materials. Gather the following items before you begin:
- Bucket: Fill it with water to use for rinsing and cleaning.
- Mild detergent: Use a gentle soap or specially formulated scooter cleaner to avoid damage to the paintwork.
- Cleaning brushes: Have a soft bristle brush for gentle cleaning, as well as a stiffer brush for stubborn dirt or grime.
- Microfiber towels: These are lint-free and ideal for drying and polishing your scooter.
- Hose or pressure washer: Use this for initial rinsing, making sure not to use excessive water pressure that could damage delicate parts.
- Spray bottle: Fill it with water and a small amount of detergent for spot cleaning or quick touch-ups.
Step-by-step guide to cleaning the scooter
Follow these steps to give your scooter a thorough cleaning:
- Start by parking your scooter on a flat surface away from direct sunlight. This will prevent soap from drying too quickly, allowing you to clean more effectively.
- Rinse your scooter with water using a hose or pressure washer. Pay attention to areas with dirt or debris buildup, such as the wheels, undercarriage, and engine.
- Mix a small amount of detergent in a bucket of water and use a soft bristle brush to gently scrub the scooter’s body, focusing on one section at a time. Be careful not to scrub too hard, especially on painted surfaces, to avoid scratching or damaging the finish.
- For stubborn dirt or grime, use a stiffer brush or a sponge with a gentle scrubbing motion. Take extra care around delicate areas like lights and mirrors.
- Rinse the scooter thoroughly with clean water, making sure to remove all soap residue.
- Dry your scooter using microfiber towels, starting from the top and working your way down. This helps prevent water spots and promotes a streak-free finish.
- Once dry, inspect your scooter for any scratches, dents, or other signs of damage. Address any issues that require repair promptly to prevent further damage.
- Finish by applying a wax or polish specifically designed for motorcycles or scooters. This will help protect the paintwork and give your scooter a shiny, like-new appearance.
Remember to clean your scooter regularly, aiming for at least once a month or more frequently if you ride in dusty or dirty environments. By following this simple cleaning routine, you can keep your scooter looking its best and ensure its performance for years to come.
Tire Maintenance
Checking tire pressure
Regularly checking your scooter’s tire pressure is crucial for both safety and optimal performance. Improper tire pressure can lead to decreased traction, reduced fuel efficiency, and increased risk of accidents. To check your tire pressure:
- Use a tire pressure gauge to measure the pressure of each tire. The recommended pressure can usually be found in your scooter’s owner’s manual or on a sticker located near the tires.
- Unscrew the valve cap from one tire and press the gauge onto the valve stem to get a reading. Compare it to the recommended pressure and adjust as necessary.
- If the pressure is too low, add air using a tire pump or visit a gas station with an air compressor. If the pressure is too high, release some air by gently pressing the valve stem with a small tool or the back of the pressure gauge.
Inspecting for wear and tear
Regularly inspecting your scooter’s tires for wear and tear is essential to ensure safe and reliable riding. Check for the following signs of tire damage:
- Tread depth: Measure the depth of the tread using a depth gauge or by examining the wear indicators on the tire. If the tread depth is near or below the recommended minimum, it’s time to replace the tire.
- Cracks or bulges: Inspect the sidewalls and treads for any visible cracks, bulges, or abnormalities. These can indicate structural damage and should be addressed immediately.
- Punctures or nails: Keep an eye out for nails, screws, or other foreign objects embedded in the tire. If you notice any, have them removed and assess if the tire needs repair or replacement.
Rotating tires for even wear
To ensure even wear and extend the life of your scooter’s tires, it’s recommended to rotate them regularly. This involves moving the front tire to the rear and vice versa. By rotating the tires, you distribute the wear patterns more evenly, resulting in improved traction and a longer lifespan for each tire.
To rotate your scooter’s tires:
- Consult your scooter’s owner’s manual for any specific instructions or recommendations regarding tire rotation.
- If no specific guidelines are given, follow a standard rotation pattern. For scooters with the same-sized front and rear tires, simply switch the front and rear tires. If the tires are different sizes, consult a scooter mechanic for guidance on the best rotation approach.
Replacing tires when necessary
Over time, even with regular maintenance and care, your scooter’s tires will eventually wear out and require replacement. The frequency of tire replacement depends on various factors, including the type of tire, riding conditions, and your overall maintenance habits.
Signs that indicate it’s time to replace your scooter’s tires include:
- Tread wear indicators: If the tire’s treads have reached the recommended minimum depth or if the wear indicators are visible, it’s time for new tires.
- Sidewall damage: Any cracks, bulges, or other visible damage to the tire’s sidewall should be addressed immediately, often indicating the need for replacement.
- Punctures or irreparable damage: If a tire has a puncture that cannot be safely repaired or has sustained significant damage, it should be replaced.
When replacing your scooter’s tires, consult with a professional scooter mechanic who can guide you in selecting the right tires for your specific scooter model and riding habits. Always prioritize safety and invest in high-quality tires to ensure optimal performance.

This image is property of images.pexels.com.
Check out our product reviews!
Battery Care
Understanding scooter battery types
Scooters primarily utilize two types of batteries: lead-acid batteries and lithium-ion batteries. Understanding the characteristics and maintenance requirements of each type is essential for proper battery care.
-
Lead-acid batteries: These batteries are widely used in scooters due to their affordability and durability. However, they require regular maintenance to ensure optimal performance. Lead-acid batteries consist of individual cells filled with electrolyte, a mixture of sulfuric acid and distilled water. It’s important to check the electrolyte levels monthly and top up with distilled water if necessary. Additionally, maintain proper charging habits to prevent sulfation, which can drastically reduce battery lifespan.
-
Lithium-ion batteries: More common in electric scooters, lithium-ion batteries offer greater energy density and longer lifespan compared to lead-acid batteries. However, they are generally more expensive. Lithium-ion batteries require fewer maintenance tasks but should be periodically balanced and charged using a compatible charger.
Always refer to your scooter’s owner’s manual or consult a professional mechanic for specific battery care instructions based on the type of battery used in your scooter.
Charging the battery properly
Proper charging habits are vital to maximize the lifespan and performance of your scooter’s battery. Follow these guidelines for charging your battery:
- Use the right charger: Make sure to use a charger specifically designed for your scooter’s battery type. Using an incompatible charger can lead to damage or reduced battery life.
- Connect the charger correctly: Ensure the charger is connected to the battery terminals securely and properly. Follow the manufacturer’s instructions for proper connection.
- Charge in a well-ventilated area: Avoid charging the battery in an enclosed space to prevent the buildup of potentially harmful gases emitted during charging.
- Follow the recommended charging time: Overcharging can damage the battery, so always follow the recommended charging time specified in the owner’s manual or provided by the manufacturer.
- Avoid deep discharges: Lithium-ion batteries, in particular, should be charged before reaching critically low levels. Regularly monitor your battery charge to prevent deep discharges, as they can lead to irreparable battery damage.
Storing the battery during long periods of inactivity
If you plan to store your scooter for an extended period, proper battery storage is crucial to prevent battery deterioration and maintain its overall health. Follow these steps for storing your battery:
- Charge the battery to a proper level: Before storing, ensure the battery is charged to an optimal level, usually around 50-70% of its capacity. This helps prevent the battery from self-discharging completely, which can result in irreversible damage.
- Disconnect the battery: If possible, disconnect the battery from the scooter during storage. This prevents any electrical drain or potential damage from occurring due to long periods of inactivity.
- Store in a cool, dry place: Choose a location with a stable temperature between 15-25°C (59-77°F) and low humidity to prevent damage to the battery. Avoid storing in extreme temperatures or areas prone to moisture, such as basements or garages without climate control.
- Periodic charging: If storing for an extended period, consider periodically charging the battery to maintain its charge level. Consult the manufacturer’s recommendations for the ideal frequency and duration of charging during storage.
By following these battery care practices, you can extend the lifespan of your scooter’s battery, ensuring reliable performance and minimizing the need for premature replacements.
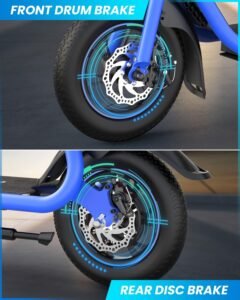
Brake System
Inspecting brake pads
The brake pads are a critical component of your scooter’s braking system and require regular inspection to ensure safe and efficient stopping power. Check the brake pads according to the following steps:
- Locate the brake calipers: Depending on your scooter’s design, the brake calipers may be visible or require removing the wheels for access.
- Check the brake pads: Inspect the brake pads for signs of wear. Most brake pads have wear indicator lines or grooves; if the pad’s thickness reaches or is close to these indicators, it’s time to replace them.
- Look for uneven wear: Examine the brake pads for signs of uneven or tapering wear. Uneven wear can indicate misalignment or a malfunctioning brake caliper, requiring further inspection or adjustment.
Ensure that you replace worn brake pads promptly according to your scooter manufacturer’s recommendations to maintain optimal braking performance.
Adjusting brake cables
Proper cable adjustment is vital for optimal braking performance. If you notice any signs of sluggish or ineffective braking, it may be necessary to adjust the brake cables. Follow these steps for adjusting brake cables:
- Locate the brake cables: The brake cables connect the brake levers to the brake calipers. They are typically visible near the handlebars and along the frame of your scooter.
- Identify the adjustment points: Most brake cables have adjustable barrels at their end, which can be turned in or out to increase or decrease tension.
- Assess cable tension: Pull the brake lever and observe the brake caliper. If there is excessive play or the brake pads do not engage promptly, the cable tension needs adjustment.
- Loosen barrel adjusters: Loosen the barrel adjusters by turning them counterclockwise to increase cable tension. Conversely, turn them clockwise to decrease tension.
- Test and fine-tune: Repeat the adjustment process, testing the brake lever’s feel and the brake pad’s engagement until you achieve the desired braking response.
If you are not comfortable with adjusting brake cables yourself or if you encounter any difficulties, consult a professional mechanic to ensure proper brake system adjustment.
Replacing brake fluid
Over time, brake fluid can become contaminated, reducing its effectiveness and compromising your scooter’s braking performance. Replacing brake fluid at regular intervals is essential for maintaining optimal safety. Here’s how to replace the brake fluid in your scooter:
- Gather the necessary materials: You will need a brake fluid suitable for your scooter model, a wrench or socket set for removing the brake caliper bolts, a clear container for collecting the old brake fluid, and a suitable rag or absorbent material.
- Locate the brake fluid reservoir: The reservoir is typically located near the handlebars and marked with a cap labeled “Brake Fluid.” Refer to your scooter’s owner’s manual to ensure the correct identification.
- Clean the area around the reservoir: Wipe away any dirt or debris around the reservoir to prevent contamination of the brake fluid.
- Remove the reservoir cap: Unscrew the cap to access the brake fluid within.
- Prepare the brake caliper: Use your wrench or socket set to loosen and remove the brake caliper bolts. Gently remove the caliper, taking care not to strain the brake line or damage the brake pads.
- Drain the old brake fluid: Carefully pour the old brake fluid into a suitable container, ensuring it does not spill onto any painted or sensitive areas. Use a rag or absorbent material to clean up any spills promptly.
- Refill with new brake fluid: Slowly pour the new brake fluid into the reservoir, avoiding any contamination or spills. Use the recommended brake fluid type specified by your scooter manufacturer.
- Bleed the brakes: With the caliper reattached, use a brake bleeding kit or consult a mechanic to perform a brake bleeding procedure, which removes any air bubbles from the braking system. This step ensures proper brake function and pedal feel.
- Test the brakes: After replacing the brake fluid, test the brakes carefully in a safe, controlled environment to verify their functionality and responsiveness.
If you are unfamiliar with the process or uncomfortable performing the brake fluid replacement yourself, it is advisable to seek assistance from a professional mechanic. Brake system maintenance is vital for your safety, so never compromise on the proper functioning of your scooter’s brakes.

This image is property of images.pexels.com.
Chain and Belt Maintenance
Cleaning and lubricating the chain or belt
The chain or belt is an integral part of your scooter’s drivetrain and requires regular cleaning and lubrication to ensure smooth operation and extended lifespan. Follow these steps to clean and lubricate your scooter’s chain or belt:
- Prepare the necessary materials: You will need a suitable chain or belt cleaner, a soft bristle brush, a clean cloth or rag, and a specially formulated chain lubricant or belt conditioner.
- Safety first: Park your scooter on a level surface and engage the parking brake to prevent any accidental movement.
- Clean the chain or belt: Apply the chain or belt cleaner directly onto the surface of the chain or belt. Use the soft bristle brush to scrub away any dirt, grime, or debris that has accumulated. Pay attention to hard-to-reach areas and ensure thorough cleaning.
- Wipe away excess cleaner: Once the chain or belt is clean, use a clean cloth or rag to wipe away any remaining cleaner. Ensure the chain or belt is dry before proceeding to the lubrication step.
- Lubricate the chain or apply conditioner to the belt: Apply the recommended chain lubricant or belt conditioner according to the manufacturer’s instructions. Ensure even coverage along the length of the chain or belt while avoiding excessive lubricant.
- Allow the lubricant or conditioner to penetrate: Give the lubricant or conditioner some time to penetrate the chain or belt. This allows it to reach all the moving parts and provide the necessary lubrication or conditioning.
- Remove excess lubricant: After the recommended penetration time, use a clean cloth or rag to wipe away any excess lubricant or conditioner. Removing the excess ensures the chain or belt remains clean and prevents attractio